

The goal of my sabbatical mini-projects is to stretch my brain into new areas. Practically, for September, this became a newfound obsession with radio projects - an ADS-B receiving station (i.e. aircraft tracking - writeup coming soon), and then learning about Meshtastic and LoRa. I also wanted to mount both outside, which would involve learning how to prepare an antenna AND any hardware safely for the elements. None of this is rocket science, but it was new to me.
For my node, I opted for a Raspberry Pi Zero 2W instead of using a microcontroller (e.g. ESP32 or Raspberry Pi Pico), which is the more common choice. This way, it’s just another linux box at my house, and it’s fits into my third mini-project, which is learning ansible.
Here’s a list of the parts I bought just to create the base node indoors:
- Raspberry Pi Zero 2W - (amazon, digikey)
- SD Card (amazon) - prioritize endurance over speed. I’ve been using the Samsung cards.
- USB Micro B power supply - (amazon) - pick one, I trust the stuff from Canakit on Amazon, but these should be relatively safe - i’ve used random ones before.
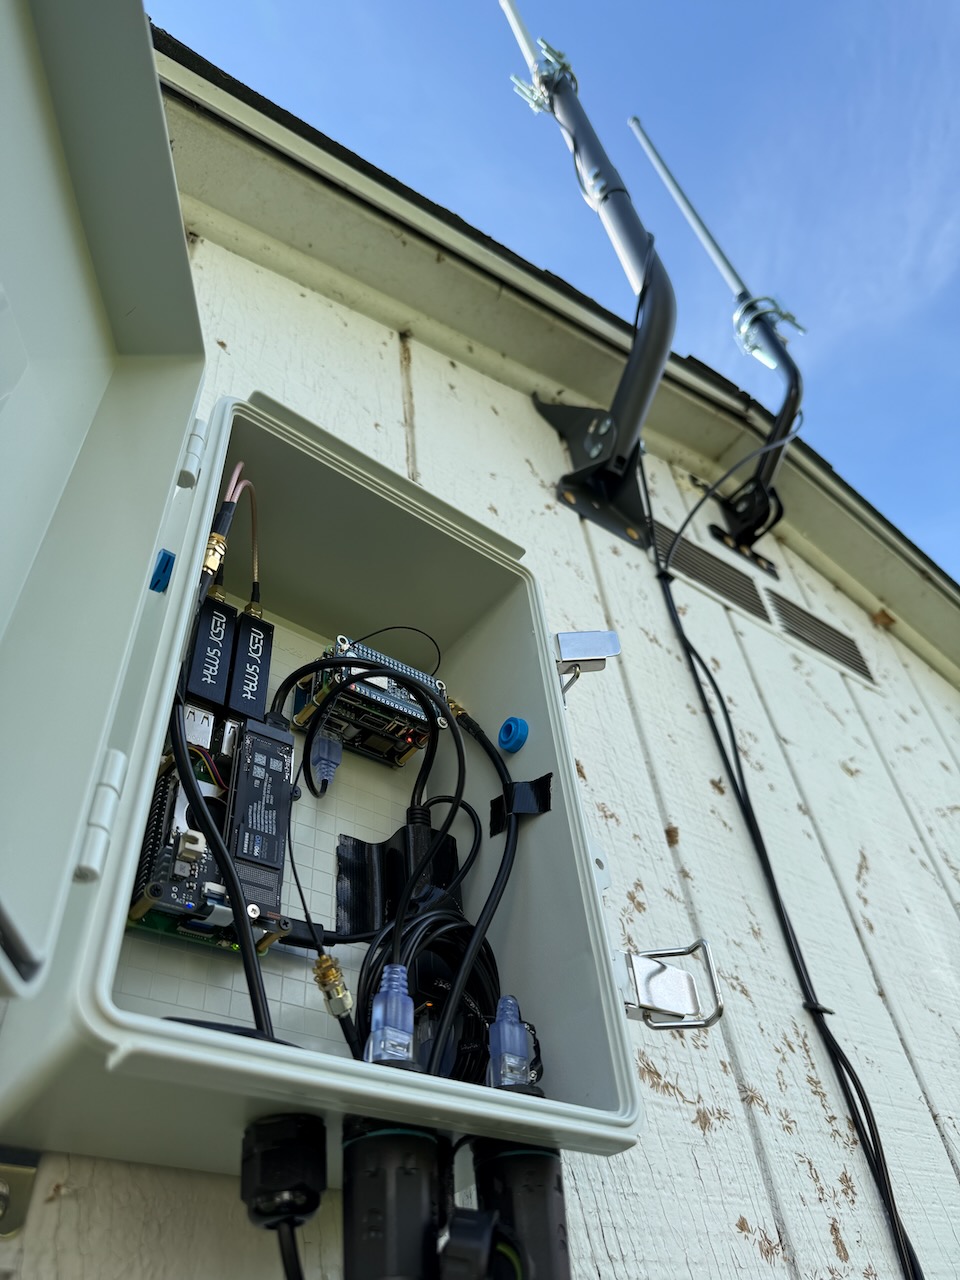
- SEE UPDATE BELOW WaveShare LoRa HAT with GPS - (pishop, waveshare) - this is a kit - includes indoor antennas. 915Mhz is the right frequency for the US, and I got the one with GNSS.
- UPDATE Do not use the HAT above - it has a limitation handling long messages because it lacks a temperature-controlled oscillator (or TCXO). More information in this video on YouTube. I don’t have a great recommendation for a replacement yet. I’m using the Meshadv v1.1 but it’s from a community member who sells via Etsy. There just aren’t that many available at any time.
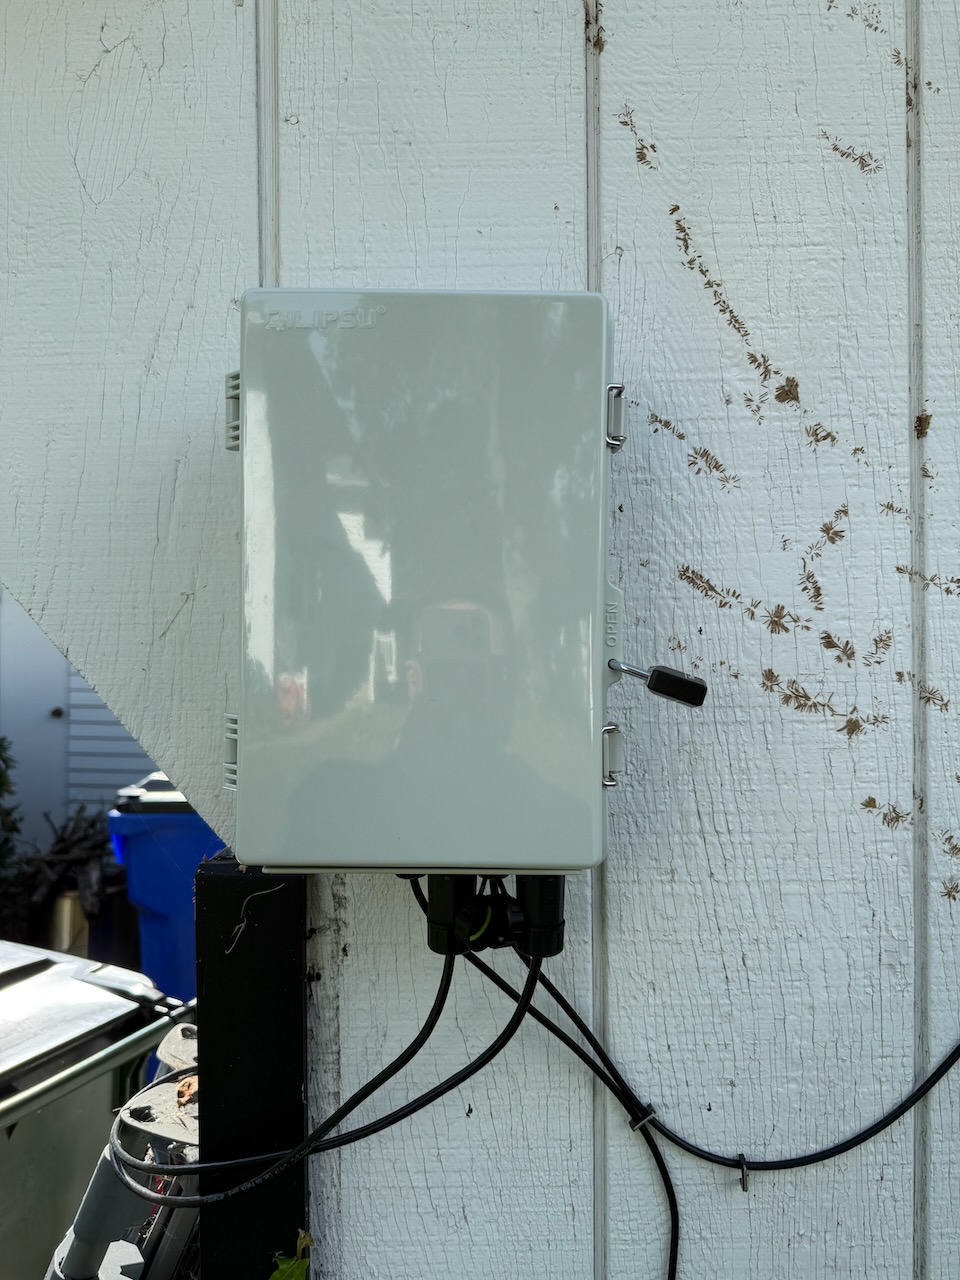
To get this contraption outside, I had to solve for a few issues: powering the Pi without an outlet nearby and making the whole thing weatherproof. This had some knock-on changes - e.g. getting different antennas that could handle the elements.
- Weatherproof Outdoor Enclosure (amazon) - there are many options, this is the one I chose and it’s held up bone dry through a couple of rainstorms so far. My buddy who got me hooked on this found a different one with a better mounting plate (holes were pre-drilled). Might be worth looking at other options, though I really like this one so far.
- POE HAT for the Zero (amazon) - I decided POE would be the safest way to run power out to the mounting location. Low voltage keeps a lot of the electrical code considerations simple, and it’s easy enough to fix.
- Outdoor ethernet cables (amazon) - get just the length you need, or make your own. You’ll also need short patch cables for inside the enclosure. I recommend these super thin Monoprice cables, as always.
- Netgear POE Switch (amazon) - You’ll need something to power the POE, so a switch or POE injector will be required. I have had good luck so far with Netgear. We’ll see how it holds up in the dusty garage.
- Outdoor rated LoRa antenna (amazon) - I was in a rush, in hindsight I may have gone with something from Rokland to ensure quality. It’s been good so far. I will be trying a Rokland-sourced antenna in the second node I’m building, will update this once I have some data.
- Outdoor rated antenna cable (amazon) - the antenna comes with one, but I wanted something closer to the exact length of my run. Adding this to the list here because it’s worth considering the length of the wiring - there’s some relationship between signal loss and cable length, though I’m not an expert.
- (optional) Antenna Mount (amazon) - the antenna comes with some wall mounting options, but if you have eaves or any roof overhang for your mounting location, they won’t work. This little arm was enough. Double check the mounts are square out of the box. I had to return one because it was welded out of square, and one I mounted was also out of square. I didn’t notice until it was up…
- Waterproof panel mounts/cable connectors (amazon) - need to get the POE into the weatherproof box while keeping out bugs and the elements. This is specifically for the ethernet ingress.
- Waterproof panel mounts/glands (amazon) - this is to allow the antenna cables into the box. Use the smallest that will seal well against the cable.
- Breather valves (amazon) - the box will get hot, and air has moisture. I have another Pi in the box running two RTL-SDR radios for ADS-B tracking, and they get quite hot - too-hot-to-touch hot. The bleeder valves allow some way for the warm air to escape while maintaining the weather seal. I’m not sure this is enough - I may need to get a weatherproof fan or vent added to the box to cool it in the height of the summer, but I’m hoping this is enough.
- Rokland RokTape (rokland store) - Recommended by the same friend that got me started on the project, I used this to seal the connections to the antenna. Apparently, moisture can seep into the cable, destroying it.
As you can see, the outdoor part of this was by far the most expensive aspect of the project. Once you fall down the rabbit hole, though…
And this doesn’t include any other tooling you may need. I needed hole saws to bore holes into the weatherproof enclosure for the glands, for example, caulk, etc to seal any ingress into the shed where all of this is mounted. I already had ladders, etc. to do most of the work.
It felt really good getting it all mounted, though. Hardware has been stable for the 2 weeks it’s been running. So far, so good!
Software setup: #
I started with a base Raspberry Pi OS 64-bit Lite install on the SD card. I then basically followed the instructions here: Install Meshtastic on Linux-Native Devices. I have an ansible role I am happy to share at the end of the post if you want to see exactly what I installed to get it running.
Gotchas: #
As always, noting down some things that got me in trouble.
- RP-SMA vs SMA connectors. This is mildly infuriating, because not only is it confusing, the vendors on places like amazon are also confused and will sometimes mislabel their connectors. Which means, sometimes you will have a “male” and “female” pair of connectors on a wire and a board that look like they should go together, but both have holes for a pin to go into. Here’s more detail on the difference. Bottom line, look closely at product photos to double check you’re getting what you actually need.
- GPS - I still don’t have the GPS functionality working. For whatever reason, I never get a lock, I’ve tried it outside and just gave up. Appreciate any hints on this one.
Photos #
Some additional photos.

Ansible role for the Pi #
Just included the text here. It’s not perfect, which is why I’m not sharing the repository directly yet (I’m literally brand new to ansible):
meshtastic/tasks/main.yml
-   name: run apt-get update
    become: true
    ansible.builtin.apt:
      update_cache: yes

-   name: install base meshtastic dependencies
    become: true
    ansible.builtin.apt:
      name: "{{ item }}"
      state: present
    loop:
    -   libgpiod-dev
    -   libyaml-cpp-dev
    -   libbluetooth-dev
        register: base_meshtastic_dependencies

-   name: install meshtasticd web server dependencies
    become: true
    ansible.builtin.apt:
      name: "{{ item }}"
      state: present
    loop:
    -   openssl
    -   libssl-dev
    -   libulfius-dev
    -   liborcania-dev
        register: web_meshtastic_dependencies

-   name: Enable SPI on Raspberry Pi
    include_tasks: configtxt.yml
    vars:
      raspberry_pi_boot_config_options:
        - line: "dtoverlay=disable-bt"
          regexp: "^dtoverlay=disable-bt$"
          insertafter: "#dtparam=spi=on"
        - line: "dtparam=spi=on"
          regexp: "^dtparam=spi=on$"
          insertafter: "#dtparam=spi=on"
        - line: "dtoverlay=spi0-0cs"
          regexp: "^dtoverlay=spi0-0cs$"
          insertafter: "#dtparam=spi=on"
        - line: "enable_uart=1"
          regexp: "^enable_uart=1$"
          insertafter: "#dtparam=spi=on"

-   name: Check if reboot required
    stat:
      path: /var/run/reboot-required
    register: reboot_required_file

-   name: Reboot if required
    become: true
    reboot:
    when: reboot_required_file.stat.exists == true

-   name: download latest deb file locally
    become: true
    ansible.builtin.get_url:
      url: "<https://github.com/meshtastic/firmware/releases/download/v2.4.2.5b45303/meshtasticd_2.4.2.5b45303_arm64.deb">
      dest: "/tmp/meshtasticd_2.4.2.5b45303_arm64.deb"

-   name: install meshtasticd
    become: true
    ansible.builtin.apt:
      deb: "/tmp/meshtasticd_2.4.2.5b45303_arm64.deb"
    register: meshtasticd_install

-   name: backup config file
    become: true
    ansible.builtin.file:
      src: /etc/meshtasticd/config.yaml
      dest: /etc/meshtasticd/config.yaml.bak.{{ ansible_date_time.date }}
    when: meshtasticd_install.changed == true

-   name: Copy config file to /etc/meshtasticd
    become: true
    ansible.builtin.copy:
      src: "meshtasticd_config.yaml"
      dest: /etc/meshtasticd/config.yaml

-   name: Reload service meshtasticd, in all cases
    become: true
    ansible.builtin.systemd_service:
      name: meshtasticd
      state: restarted
      enabled: true

-   name: Install python3
    become: true
    ansible.builtin.apt:
      name: python3
      state: present
      update_cache: true

-   name: Install python3-pip
    become: true
    ansible.builtin.apt:
      name: python3-pip
      state: present
      update_cache: true

-   name: Install meshtastic python library
    become: true
    ansible.builtin.pip:
      name: meshtastic
      state: present
      break_system_packages: true

-   name: Configure meshtastic
    ansible.builtin.shell: |
      meshtastic --host localhost --set-owner '<your host name here>' --set-owner-short '<your host short name here>' --set lora.region US --set position.gps_mode ENABLED
      meshtastic --host localhost --set mqtt.enabled true --set mqtt.address 'mqtt.meshtastic.liamcottle.net' --set mqtt.username 'uplink' --set mqtt.password 'uplink' --set mqtt.encryption_enabled true
meshtastic/tasks/configtxt.yml
---
# Inspired by Jeff Geerling's playbook:
# <https://github.com/geerlingguy/ansible-role-raspberry-pi/blob/master/tasks/main.yml>

-   name: Configure options in /boot/firmware/config.txt.
    become: true
    lineinfile:
      dest: /boot/firmware/config.txt
      regexp: "{{ item.regexp }}"
      line: "{{ item.line }}"
      insertafter: "{{ item.insertafter }}"
      state: present
    loop: "{{ raspberry_pi_boot_config_options }}"
meshtastic/files/meshtasticd_config.yaml
Lora:
  Module: sx1262  # Waveshare SX126X XXXM
  DIO2_AS_RF_SWITCH: true
  CS: 21
  IRQ: 16
  Busy: 20
  Reset: 18

GPIO:

# User: 6

### Define GPS

GPS:
  SerialPath: /dev/ttyAMA0

### Specify I2C device, or leave blank for none

I2C:

# I2CDevice: /dev/i2c-1

### Set up SPI displays here. Note that I2C displays are generally auto-detected.

Display:

Webserver:
  Port: 443 # Port for Webserver & Webservices
  RootPath: /usr/share/doc/meshtasticd/web # Root Dir of WebServer

Logging:
  LogLevel: info # debug, info, warn, error

# TraceFile: /var/log/meshtasticd.json

General:
  MaxNodes: 200
  MaxMessageQueue: 100